
Taking screenshots on a laptop is an incredibly useful skill. Whether you’re capturing an important document, saving a recipe, sharing a funny moment with a friend, or troubleshooting a problem, the ability to take a screenshot can save you time and effort.
Taking a screenshot on a laptop is simple with built-in shortcuts. On Windows, you can use the PrtScn key or apps like Snipping Tool, while on Macs, Command + Shift + 3 or Command + Shift + 4 will capture your screen.
Screenshots allow you to quickly save and share what you see on your screen. In this comprehensive guide, we’ll walk you through the most common methods for taking a screenshot on both Windows and Mac laptops. We’ll also explore useful third-party apps to help you take screenshots like a pro.
Why Taking Screenshots is Important
Before diving into the process, let’s take a moment to understand why taking screenshots is important:
- Quick and Easy Sharing: Sometimes, typing out instructions or describing what’s on your screen just doesn’t cut it. A screenshot lets you visually communicate information in seconds.
- Problem Solving: When you’re facing a technical issue or need help, sharing a screenshot can allow others to better understand your problem and guide you toward a solution.
- Documentation: Screenshots are helpful for keeping a visual record of your work, such as saving receipts, proof of transactions, or capturing ideas for creative projects.
How to Take a Screenshot on a Windows Laptop

Windows laptops are equipped with multiple tools and shortcuts to help you take screenshots easily. Here are the most common methods:
1. Using the “PrtScn” Key (Print Screen)
The PrtScn key is one of the most basic ways to capture your screen. It is a simple and effective method, but it requires some extra steps to save the screenshot.
- Full-Screen Screenshot: To capture everything on your screen, press the PrtScn key. This will capture the entire screen and save the image to your clipboard. You can then paste the screenshot into any image editor, document, or chat window by pressing Ctrl + V.
- Active Window Screenshot: If you want to capture only the active window (for example, a browser or word processor), press Alt + PrtScn. This will capture the currently focused window and copy it to your clipboard. You can then paste the screenshot into an editor or document.
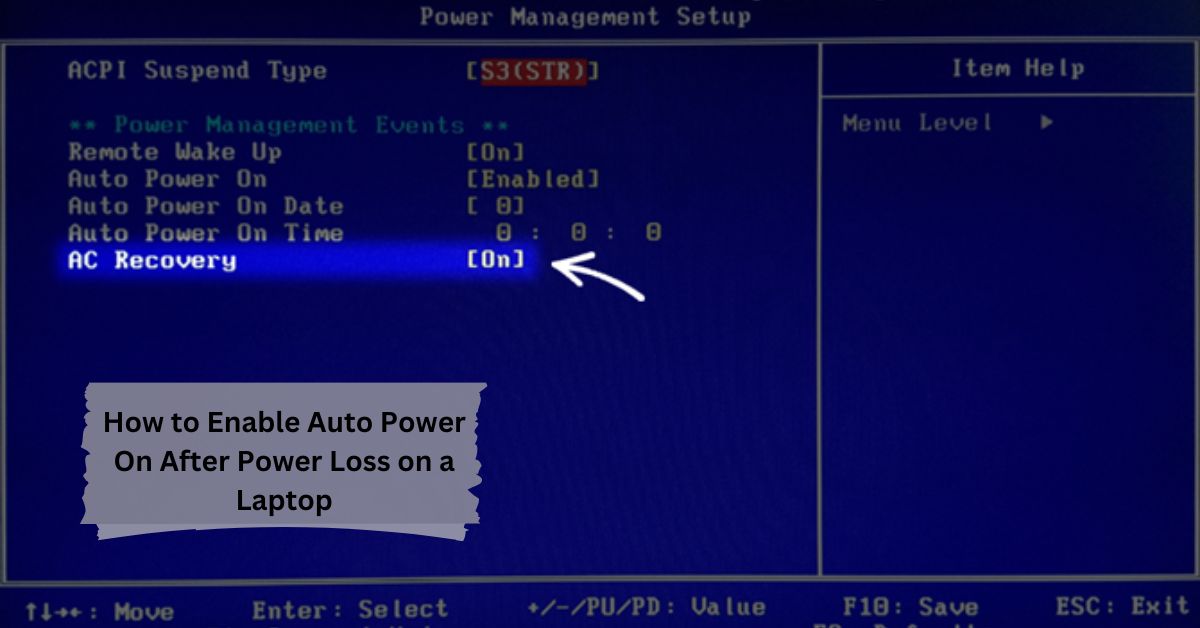
- Capture and Save to File: If you prefer to save the screenshot directly to a file without pasting it into a program, press Windows key + PrtScn. This will automatically save the screenshot to your “Pictures” folder, under “Screenshots.”
2. Using the Snipping Tool or Snip & Sketch
Windows also offers more flexibility with its built-in Snipping Tool and Snip & Sketch apps, both of which allow you to capture custom areas on your screen. This is perfect if you don’t want to capture the entire screen or if you want to annotate the screenshot.
- Snipping Tool: Open the Snipping Tool (you can search for it in the Start menu) and click “New” to select the area you want to capture. You can choose from free-form, rectangular, window, or full-screen snips. Once captured, you can annotate and save the screenshot as an image.
- Snip & Sketch: Snip & Sketch is another app built into Windows 10 and later. Press Windows key + Shift + S to open the Snip & Sketch toolbar. From here, you can choose between rectangular, free-form, or full-screen captures. The screenshot will be copied to your clipboard, and you can open Snip & Sketch to annotate and save the image.
3. Using Windows Game Bar (for Gaming Screenshots)
If you’re a gamer, Windows 10 and 11 offer an integrated tool to capture screenshots while gaming. Press Windows key + G to open the Game Bar. From here, you can click the camera icon or press Windows key + Alt + PrtScn to capture the current game window.
4. How to Edit and Save Screenshots in Windows
Once you’ve taken a screenshot, you may want to crop, annotate, or edit it. You can use apps like Paint, Paint 3D, or Photos to modify the screenshot before saving.
- To edit a screenshot, simply paste it into one of these apps and use the available tools to crop, resize, or add annotations. Once you’re done, click File > Save As to store the image in your preferred location.
Read: Why Is My HP Laptop Not Charging – Comprehensive Troubleshooting Guide!
How to Take a Screenshot on a Mac Laptop

Mac laptops offer a simple and effective way to capture screenshots without the need for additional software. Below are the key shortcuts you can use to take screenshots:
1. Using Keyboard Shortcuts
Mac’s built-in keyboard shortcuts make it quick and easy to capture a screenshot. Here’s a rundown of the options:
- Full-Screen Screenshot: To capture the entire screen, press Command + Shift + 3. This will take a snapshot of everything visible on your screen. The image will automatically be saved to your desktop.
- Capture a Selected Area: If you want to capture only a portion of your screen, press Command + Shift + 4. Your cursor will change into a crosshair, and you can click and drag to select the area you want to capture. When you release the mouse button, the screenshot will be saved to your desktop.
- Capture a Specific Window: After pressing Command + Shift + 4, hit the Spacebar. The cursor will change to a camera icon. Hover over the window you want to capture and click to take a screenshot of that window. It will be saved to your desktop.
- Capture the Touch Bar (for MacBook Pro): If you’re using a MacBook Pro with a Touch Bar, press Command + Shift + 6 to capture everything displayed on the Touch Bar.
2. Saving and Managing Screenshots on Mac
By default, all screenshots on a Mac are saved to your desktop as PNG files. You can change the default save location by using the Terminal or a third-party app like TinkerTool.
3. Using Preview to Capture and Edit Screenshots
For further customization, you can use the Preview app on your Mac to take screenshots. Open Preview and select File > Take Screenshot to capture the full screen, a selected area, or a window. Once the screenshot is captured, Preview allows you to annotate, crop, or edit the image.
Read: How to Charge a Laptop Without a Charger: 7 Easy and Practical Methods!
How to Take a Screenshot with Third-Party Apps

While the built-in tools are great, there are third-party applications that offer additional features for users who need more control over their screenshots.
1. Snagit
Snagit is a powerful screenshot and screen recording tool that offers advanced features like scrolling capture, the ability to capture long web pages or documents, and even record videos. You can annotate, edit, and share your screenshots easily. It’s a paid app, but it offers a free trial so you can test it out.
2. Lightshot
Lightshot is a free and easy-to-use screenshot tool. It allows you to capture specific areas of your screen and edit screenshots right after taking them. It also has a built-in search feature to find similar images online. You can save or upload your screenshots to the cloud for easy sharing.
3. Greenshot
Greenshot is a free, open-source screenshot tool for Windows. It allows you to capture regions, windows, and full screens, and you can annotate and export the images to various formats. It’s a great choice if you need a simple but powerful tool.
Read: Why Is My Laptop Not Charging? – A Comprehensive Guide to Troubleshooting!
FAQs:
1. How do I take a screenshot on a Windows laptop?
Press PrtScn for a full-screen capture, or use Windows key + PrtScn to save it directly as a file.
2. How do I capture a specific part of my screen on Mac?
Press Command + Shift + 4 and drag to select the area you want to capture.
3. Can I take screenshots while gaming on Windows?
Yes, use the Windows key + G to open the Game Bar and capture screenshots using Windows key + Alt + PrtScn.
4. How do I edit my screenshots?
You can use built-in tools like Paint on Windows or Preview on Mac to crop, annotate, and save your screenshots.
5. What are third-party apps for screenshots?
Apps like Snagit, Lightshot, and Greenshot offer advanced features like scrolling capture and easy editing.
Conclusion
Now that you know how to take a screenshot on a laptop, it’s time to start using this feature to enhance your productivity, share information, or capture precious moments. Whether you’re using a Windows or Mac laptop, both platforms provide a range of options to suit your needs. From basic keyboard shortcuts to advanced editing and annotation features, you have everything you need to capture and share your screen.


Leave a Reply